About
Dummy Public App for Shopify built with Node Includes Embedded App SDK Elkfox.
Requirements
- node.js >= 6.11.0
- mongodb >= 3.2.9
- npm >= 5.0.0
Getting Started
Introduction
This Getting Started section has been written in a tutorial format so that it can be understood by everyone of all skill levels. That being said a prior knowledge of the terminal and javascript will be required. If you have any questions at all don’t hesitate to raise an issue on Github.
This tutorial makes the assumption that you are using a unix based operating system (Mac/Linux).
Mongo Setup
First lets start by opening your terminal and checking to see if we have an installation of by typing in
mongodIf you do not have Mongo installed the command will not be found. If you do you can go ahead to the Ngrok section.
Getting started with Mongo is simple click here to find the instructions for your operating system
Quick guide to install Mongo for Mac users
I recommend using Brew to get started quickly.
First update Brew.
brew updateThen install MongoDB
brew install mongodbThen create the directory where your database will be stored.
mkdir -p /data/dbImportant
Before running mongod for the first time, ensure that the user account running mongod has read and write permissions for the data directory. It is not advised to run mongod as root user i.e don’t use sudo, setup the permissions correctly using the following command.
sudo chown -R `id -un` /data/dbNow you should be able to run the Mongo Daemon.
mongodNgrok
Your app will be receiving requests from Shopify, but you want to be able to develop your app locally. This is where Ngrok comes in. Ngrok is a tunneling service which will allow you to safely expose your local app to the internet so that it can now communicate with Shopify.
Assuming you downloaded it to your downloads folder unzip ngrok
unzip Downloads/ngrok.zipcd Downloads
unzip ./ngrok.zipThen run ngrok on port 7777
ngrok http 7777If all went well you will see a response like this
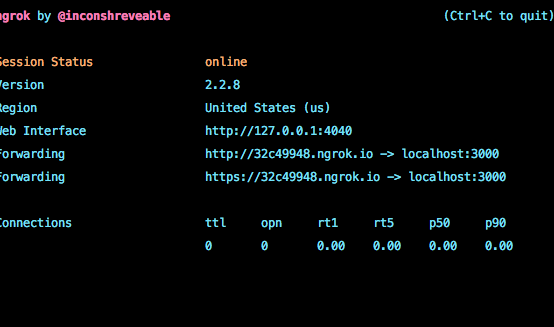
but the localhost port will be 7777 instead.
In this case the Ngrok forwarding address is: https://32c49948.ngrok.io
This is the url that will be used for reference in the rest of this tutorial. If the app were running you could now visit this url in your browser to view the app.
Note
Your ngrok forwarding address changes every time that you restart ngrok (unless you have a paid plan). To avoid OAuth failures, update your app settings in the Partner Dashboard whenever you restart ngrok.
Shopify Partner Dashboard
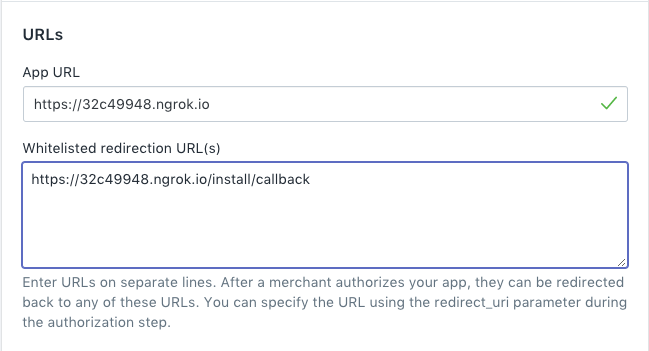
Create a new app in your Partner Dashboard using the forwarding address that ngrok creates for you.
Go to the App info tab and add https://32c49948.ngrok.io/install/callback to the Whitelisted redirection URL(s) be sure to use the HTTPS url.
Add any other relevant whitelisted urls such as https://32c49948.ngrok.io/proxy if you wish to use an app proxy.
As noted above, unless you have a paid ngrok plan you will need to change this each to you start ngrok to the new url.
Below you will see the App credentials section, take note of your API key and and API secret key. You’ll use these as environment variables in your app.
Configuration
If you haven’t done so already fork and clone the repository
And install all the required Node packages
npm installIn the config directory we store the variables for the different environments. Production refers to the live environment and development is the local. index.js is the global variables with the current environment.
Go into config/development.js and change the APP_URI to the your ngrok forwarding address. In my case it’s https://32c49948.ngrok.io
Now ensure that you have .env in your .gitignore because we will be storing sensitive information in this file such as our API secret. if it isn’t add it now.
Now create a new file in your app root called .env and add the API credentials we created earlier in the Shopify Partner Dashboard. It should look like this:
SHOPIFY_API_KEY=xxxxxxxxxxxxxxxxxxxxxxxxxxxxxxxxxxxx
SHOPIFY_SHARED_SECRET=xxxxxxxxxxxxxxxxxxxxxxxxxxxxxx
If you want to use port other than 7777 you can add that now too.
PORT=3000Okay now lets get our app running!
npm startYou should now be able to install your app if you visit the installation url.
My Shopify store url is hello-world.myshopify.com
and my ngrok forwarding address is https://32c49948.ngrok.io/
therefore my installation url is
https://32c49948.ngrok.io/?shop=hello-world`
Congratulations 🙌
Configuration
Inside the config/ directory there are three files
- development.js - Development only configuration variables
- index.js - Global configuration variables
- production.js - Production only configuration variables
This is where you’ll place any configuration variables you’ll need or any references you’ll need to environment variables later on.
When the app is initalised it checks where process.env.NODE_ENV is set to production or not and will load the relevant configurations.
Default configuration located in config/index.js variables are:
- SHOPIFY_API_KEY - Your apps API Key. Generated when you set up the app and required to run and install the app
- SHOPIFY_SHARED_SECRET - Your apps secret key. Generated when you set up the app and required to run and install the app.
- APP_NAME - The name of your app. Can be left blank if you’d prefer to hardcode it in.
- APP_SCOPE - The parts of the Shopify API your app will want access to. See below for a list of possible scopes. This is required to install the app. You must have at least one scope permission.
Running
Debug mode
To start the app in debug mode simply run npm run debug. This will start the app on port 3000 with debugging turned on.
You can access the app by visiting localhost:3000
Also available is npm run debugwatch which will start nodemon and allow you live-restart your server whenever you make changes.
Production mode
You can start the app in production mode by running npm start or npm watch.
Note: You must set the environment variable PORT to whatever port you wish to run your production server on. (80, 8000, 8080, etc) If this is not defined app will run on port 3000 like in development mode.
Utils
There are two util commands available:
npm run cleardbs - Which runs ./utils/cleardbs.js and removes any entries in the databases you specify. By default it’s set up to remove entries from Shop and Counter.
npm run seeddbs - Seeds databases using your settings inside ./utils/seeddbs.js. Currently the only database it seeds is Counter.
Views
Node Shopify App uses handlebars as it’s template engine.
Views are located in the views/ folder and while some use a shared layout.hbs file you are under no obligation to use this file and your .hbs files can contain it’s own html head and body. At the moment views are split into their current folders. The embedded app markup is located inside apps/app.hbs. Anything located in the root views/ folder is for general use while index.hbs is what a non-shop should see if they visit https://<config.APP_URI>
Routes
Routes can be found in the routes/ folder in the root directory of the app.
| File | Route | Description |
|---|---|---|
index.js |
/ |
Any non-app related endpoints should go here (General website endpoints such as /about, /contact, etc). |
install.js |
/install/ |
Where you should place any methods relevant to the installation of you app. This is also where you should set up any ‘post install’ methods such as setting up webhooks or adding files to themes. |
webhooks.js |
/webhooks/ |
Where you should place any requests to webhooks. This includes a middleware that checks to see if a webhook has made a legitemate request from Shopify. |
api.js |
/api/ |
Where you should place any api endpoints you wish to use for your app if you plan on having front end components. |
proxy.js |
/proxy/ |
Where you should place any proxy related routes. This is handy if you set up an app proxy when setting up your app. This will serve any files sent from it as liquid which allows Shopify to pass liquid objects to the files and allows you to use liquid inside your templates. |
Application Scope
When you develop an app you must tell Shopify and the store owner what parts of the store you want to access and modify.
To declare application scope you can edit the APP_SCOPE variable in config/index.js by listing your scopes seperated by commas.
Available scopes
These are the available scopes for your application
| Scope | Description |
|---|---|
| read_content, write_content | Access to Article, Blog, Comment, Page, and Redirect. |
| read_themes, write_themes | Access to Asset and Theme. |
| read_products, write_products | Access to Product, product variant, Product Image, Collect, Custom Collection, and Smart Collection. |
| read_customers, write_customers | Access to Customer and Saved Search. |
| read_orders, write_orders | Access to Order, Transaction and Fulfillment. |
| read_draft_orders, write_draft_orders | Access to Draft Order. |
| read_script_tags, write_script_tags | Access to Script Tag. |
| read_fulfillments, write_fulfillments | Access to Fulfillment Service. |
| read_shipping, write_shipping | Access to Carrier Service. |
| read_analytics | Access to Analytics API. |
| read_users, write_users | Access to User SHOPIFY PLUS. |
| read_checkouts, write_checkouts | Access to Checkouts. |
Helper Functions
There are a number of helper functions available in helpers/index.js these make tasks that might need to be repeated multiple times simple and quick to save time.
| Function | Arguments | Returns | Description |
|---|---|---|---|
| openWebhook | shop(Shop) | Accepts a Shop object from mongoose and returns a new ShopifyAPI session. | |
| buildWebhook | topic (String) address(String, default: APP_URI/webhook) shop(ShopifyAPI) callback(err, data, headers) |
callback || Boolean | Creates a new webhook on the Shop you’re currently working on. Once complete it fires the callback passed to it. |
| generateNonce | length(Int, default: 8) | String | Generates a random string of characters to represent a nonce that meets Shopify’s requirements for app installation |
| verifyHmac | data (String) hmac (String) |
Boolean | Generates a hash from the passed data and compares it to the hash sent by Shopify. Returns true or false |
| verifyOAuth | query (Object) | Boolean | Takes a request query and checks to see if it’s a request from Shopify. Returns true or false |